Setting Up Pay Bills In QuickBooks will be discussed in this article. Let’s face it — paying bills is a headache for any business owner. From vendor payments to utility bills, it’s a juggling act that requires skill and precision. The good news is that you don’t have to navigate it alone. With tools like QuickBooks Bill Pay, you’ll ease the burden of bill payments and reclaim valuable time to focus on what you do best. So, how do you use it?
Setting Up Pay Bills In QuickBooks In 2024
In this article, you can know about Setting Up Pay Bills In QuickBooks here are the details below;
In this blog, you’ll learn all about setting up pay bills in QuickBooks Online, from entering vendor information to recording bill payments.
What is QuickBooks Bill Pay?
Before setting up pay bills in QuickBooks Online, let’s explore QuickBooks Bill Pay. QuickBooks Bill Pay is a built-in payment solution for small business owners using QuickBooks. It integrates bill payments with your accounting software to ensure your financial data is always in sync.
Imagine ditching the tedious, manual work involved in paying bills. That’s what QuickBooks Bill Pay offers with its powerful automation. You can even schedule payments ahead of time, and QuickBooks will automatically send the funds to help you avoid late fees and credit hiccups. As for vendors who prefer the old-school approach, QuickBooks can also mail a physical check on your behalf.
QuickBooks works with any type of business bill, similarly to its flexibility in receiving payments. This includes bills for merchandising, rent, taxes, and utilities.
Additional benefits of QuickBooks Bill Pay include:
- Data protection and time savings: Protect your financial data and reduce the time spent on manual payments. That means no more unnecessary bank visits or managing several accounts.
- More control: Take control of your bill payments to help you stay financially organized and improve cash flow.
- One-stop solution: Handle all your bill payments, from vendors to utilities, in one place.
- Simplified compliance and delegation: Track and file 1099 forms easily. Plus, assign team members specific roles for bill payments to enhance security and efficiency.
- Efficient invoice management: Import invoices into QuickBooks and automate payment schedules. This reduces manual effort and frees up valuable time for you to focus on your business.
Different payment methods with Quickbooks Bill Pay
Now that you’re up to speed, let’s explore two payment methods you can use when setting up pay bills in QuickBooks:
Pay bills with a acclaim card or cash
QuickBooks Bill Pay gives you the freedom to pay bills using credit cards or cash. This flexibility lets you choose the best payment method for your needs and financial strategy.
Using credit cards gives you extra time before funds leave your account, a plus for managing cash flow. On the other hand, cash payments are great for immediate business expense budgeting.
Pay bills with a check
For those who prefer traditional payment methods, QuickBooks also lets you easily pay bills by check.
This method is useful for transactions that require physical proof of payment or for vendors who do not accept electronic payments.
Read on to learn how to record bill payments with credit card, cash, and check. By the end, you’ll know precisely how to pay a bill in QuickBooks Online.
How to enter or edit payment information
A great first step when learning how to pay bills in QuickBooks Online is to establish your payment terms and information.
QuickBooks Bill Pay makes it easy to enter, view, and edit a vendor’s payment details. This means you can confidently keep your payments on track and your vendor information up-to-date.
To enter or edit payment information in QuickBooks:
- Log in to your QuickBooks Online account.
- In the “Banking” tab, select “Add Account” to connect your bank account.
- Click on the “Expenses” tab in the left menu bar.
- Under “Manage Vendors,” click on “New Vendor” and enter their information, such as contact details, name, and payment terms.
- In “Settings,” select “Account and Settings.”
- Go to “Expenses,” then “Bills and Expenses,” and activate “Make payments.”
- Select “Set up bank transfers” for your vendor, input their bank account info, and fill in the required fields.
- Click “Save.”
Once you’ve entered your payment details, you’re ready to learn how to pay a bill in QuickBooks Online.
How to find and manage your unpaid bills
While it’s not as exciting as watching revenue come in, setting up pay bills in QuickBooks also involves tracking and handling your unpaid bills.
Luckily, managing all your bills in QuickBooks Online is a smooth process. In just a few steps, you can view, sort, and pay outstanding bills. This convenient payment processing cuts manual work and helps you avoid any late payment fees.
- To find and manage your unpaid bills:
- Log in to QuickBooks Online.
- Select “Bills” under the “Expenses” tab.
Use the tabs: “For review,” “Unpaid,” and “Paid” to organize bills. Let’s break them down:
For review
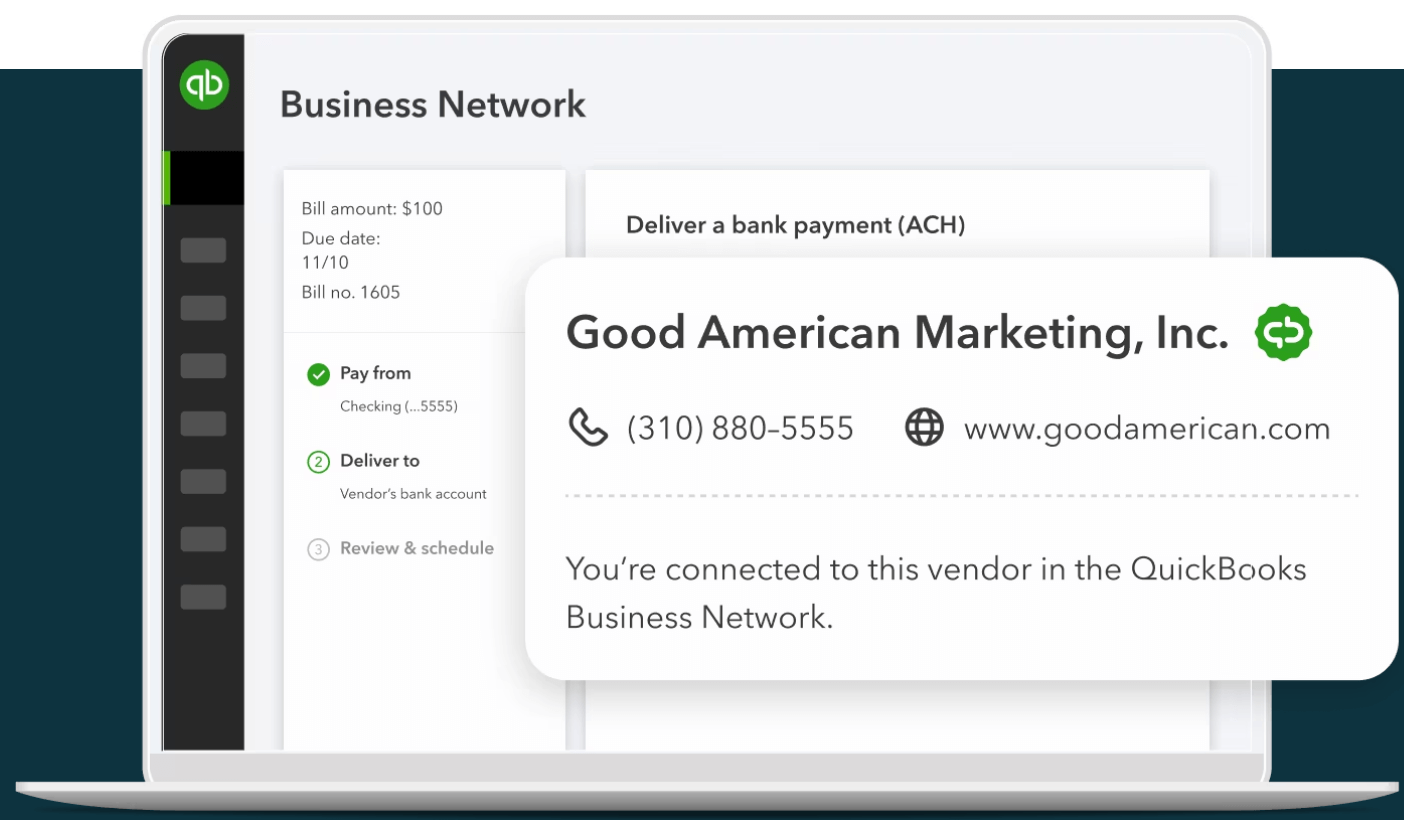
“For review” displays bills awaiting your review, including those from the QuickBooks Business Network.
Clicking “Review” lets you check bill details for accuracy. From there, you have the option to save them under “Unpaid” or schedule them for payment.
Hitting “Save” automatically moves the bill to “Unpaid,” or “Paid” if the amount due is $0.00.
Unpaid
“Unpaid” shows all your bills you haven’t paid yet. You have a few options here.
For one, you can “Schedule payment” using a QuickBooks-connected bank or credit card to easily transfer funds.
If you’ve already made an online payment for a bill outside of QuickBooks, you can click “Mark as paid” to move it to the proper tab.
Finally, the “View/Edit” option lets you see and adjust the bill’s details. Once you’re happy with your changes, you can select “Save” or “Save and schedule payment” depending on the action you want to take.
Paid
The “Paid” tab displays all your settled bills and their linked payments, with the option to view details. This is a great area to monitor and assess your payment history to inform cash flow management and operational performance.
How to schedule bill payments with Quickbooks Bill Pay
A key aspect of setting up pay bills in QuickBooks Online is scheduling payments. This feature keeps your business’ financial commitments in line while removing the hassle of manual follow-ups.
In a nutshell, scheduling bill payments lets you automate your payment process. You can schedule payments days in advance, which is especially useful for recurring payments.
Here’s how you can accomplish this:
- Sign in to QuickBooks Online.
- Go to “Expenses,” then “Bills.”
- Create a new bill or choose an existing bill screen.
- Choose “Schedule Payment” or “Save and Schedule Payment.”
- For new bills, you can schedule directly with the “Save and Schedule Payment” option.
- To schedule payments for unpaid bills, access the “Expenses,” “Vendors,” or “Bills” tab. This allows you to locate unpaid bills in the system and establish their payment schedules.
- Pick a bank account and “Edit” the payment amount if needed.
- To add an account, connect to your bank online or enter its details manually. QuickBooks will send two small stakes to the account within three days for verification.
- Select an account from the “Payment account in QuickBooks” dropdown list, or add a new one.
- Click “Next.”
- Choose your payee’s preferred payment method (i.e., a bank transfer or print check) and provide the necessary details.
- Set a “Withdrawal date,” up to 90 days in the future.
- Click “Next.”
- Review and confirm the details, then click “Schedule payment.” Use “Back” to edit more or “Cancel” if you’ve changed your mind.
Note: QuickBooks Bill Pay currently only supports payments in USD.
And that’s it! QuickBooks will send you a confirmation email once it completes the payment.
How to record bill payments in QuickBooks Online
When learning how to pay bills in QuickBooks Online, scheduling and recording bills are two different processes. Scheduling plans for future expenses, while recording keeps track of what you’ve already spent.
Recording bill payments is crucial for reconciling your accounts. It ensures that your financial records always give a complete picture of your business’ spending. Also check Utiliko Alternatives
Record partial or full payments towards bills
QuickBooks Online lets you record full and partial payments.
For those unfamiliar, a partial bill payment involves paying a portion of the bill now and the rest later. This is quite common in business scenarios, especially when customers are tight on funds.
Making partial payments strengthens your relationships with vendors by fostering good faith. Even when you can’t pay the full bill immediately, regular installments show vendors you are committed to paying what you owe them. Plus, it’s a smart way to distribute your expenses, giving you more dominion over your cash flow.
QuickBooks offers two easy ways to record payments, depending on if you use:
- Credit cards or cash.
Let’s explore each option.
Paying by cash or credit card
To record cash & credit card payments towards a bill, follow these simple steps:
- Click “+ New.”
- Choose “Pay bills.”
- Select the “Payment history” from the drop-down menu.
- Optional: If you’re using a checking or savings account, input the “Starting check no.”
- Enter the “Payment date.”
- Check off the bills you’re paying.
- In the “Payment” column, enter the payment amount for each bill. You can apply credit here if available.
- Click “Save.”
Paying by check
To record check payments towards a bill, follow these steps:
- Click “+ New.”
- Select “Check.”
- Choose the vendor from the “Payee” drop-down menu.
- Select “Add” to add an open bill to the check. If not visible, click the small arrow near the amount. You can also add distinction from the “Credits” section.
- Select the payment account from the “Bank/Credit account” dropdown list.
- In the “Amount” field, enter the check amount.
- In the “Outstanding Transactions” section, choose the bills covered by the payment. Tip: To split the payment among multiple bills, check the corresponding boxes and enter all amounts in the “Payments” column.
- If you want, you can print the check here. Once you’re done, hit “Save and close.”
To sum up, QuickBooks Online simplifies bill payments, offering full and partial payment options to manage cash flow and maintain vendor relationships.
Go beyond Bill Pay with Method
Method is the #1 lead-to-cash automation tool for QuickBooks and Xero users. It makes setting up pay bills in QuickBooks even easier, along with offering several additional benefits.
Method’s two-way, real-time sync with QuickBooks ensures that your bill payments are always accurate and up to date. This means fewer mistakes and more time for you to spend on value-adding activities.
What’s more is that Method’s automation capabilities speed up and simplify your payment process for a better bottom line.


Add Comment