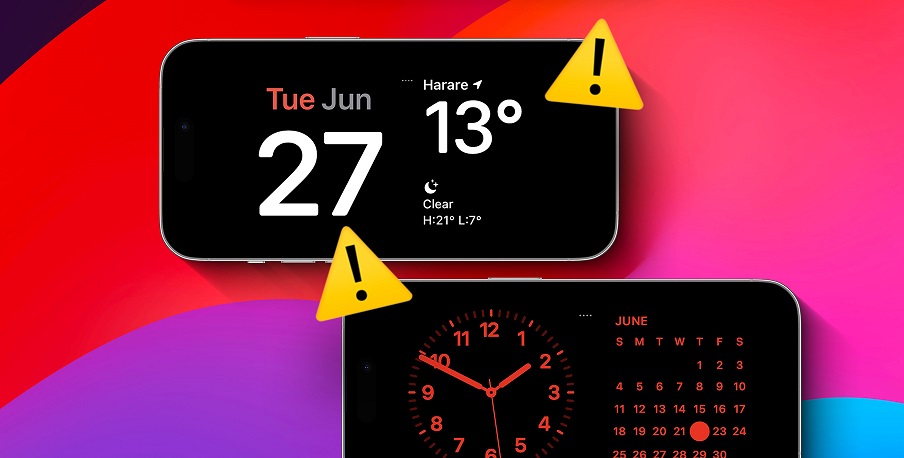
How To Fix StandBy Not Working On Your iPhone will be described in this article. StandBy is a new feature in iOS 17 that offers quite unique functionalities to your Lock Screen. It allows your iPhone to display the time on your chosen clock face, along with widgets, notifications, Live Activities, and useful data when the phone is in StandBy mode.
How To Fix StandBy Not Working On Your iPhone
In this article, you can know about How To Fix StandBy Not Working On Your iPhone here are the details below;
With some users facing issues like StandBy Not working on their iPhones, we have brought up eight working fixes to this. If you’re facing a similar issue, you should try out the tips & tricks mentioned in this guide, so that you may resolve this issue in the least possible time.
How to fix StandBy mode not working on iOS 17
There are a few reasons why StandBy mode might not be working. It could be because of a temporary problem with the operating system or a feature bug. Many times, these bugs happen because of settings that aren’t quite right or issues with stored data. You can often fix these by restarting your device.
Also, remember that StandBy mode only kicks in when your device is placed sideways, charging, and left alone for a bit. Sometimes, StandBy might not start if your device is moving or the charger isn’t working properly. Look at the sections below to figure out what’s going on with StandBy mode and how to fix it on your device.
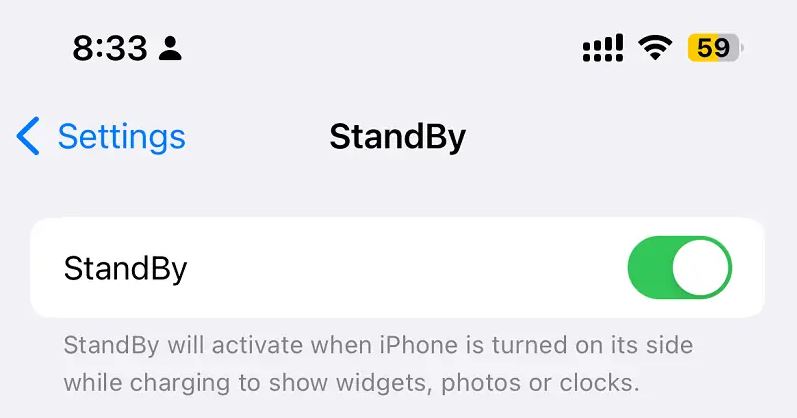
1. Check StandBy Activation
Before we dive into looking into actual solutions, it is mandatory to check if StandBy is indeed enabled on your iPhone. For this open Settings, and click on StandBy.
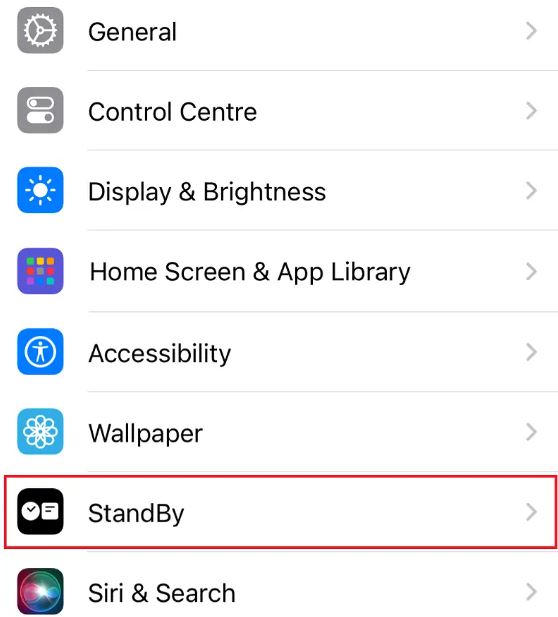
On the succeeding screen, check if the toggle switch next to StandBy is enabled or not. If you find this toggle switch turned off, make sure to turn it On.
2. Using Standby Correctly
It’s not like you can use StandBy anytime on your iPhone device. For this to work correctly, you have to check if your device meets the conditions superimposed by it. The conditions are –
- Your iPhone must be in a charging state.
- And, your iPhone must be kept in landscape orientation at an inclined angle.
When you follow these two steps correctly, StandBy should initiate as intended. Once it’s working, you can customize StandBy on your iPhone by adjusting the Photos view, clock style, or adding widgets.
3. Disable the Rotation Lock
Keeping the Rotation mode locked on your iPhone may also prevent StandBy to function properly. If that’s the case, you better disable the rotation lock and check if the StandBy not working issue resolves next.
Do note that this is a temporary fix, and Apple will soon work out and resolve this issue in its upcoming Beta update.
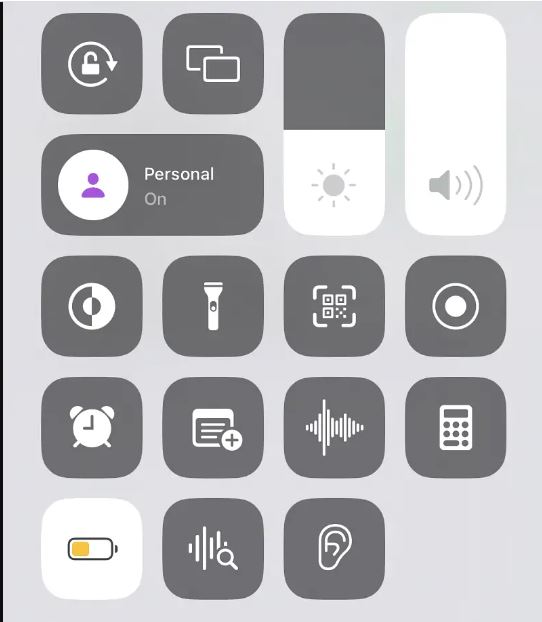
To turn off the rotation lock, open the Control Center by swiping down from the top right corner of your screen. Then, tap on the rotation lock module to disable it.
Now, you can plug in your device to a power source and place it in landscape mode while locked to activate StandBy mode. If the rotation lock bug was causing the problem, StandBy mode should now work on your device without any issues.
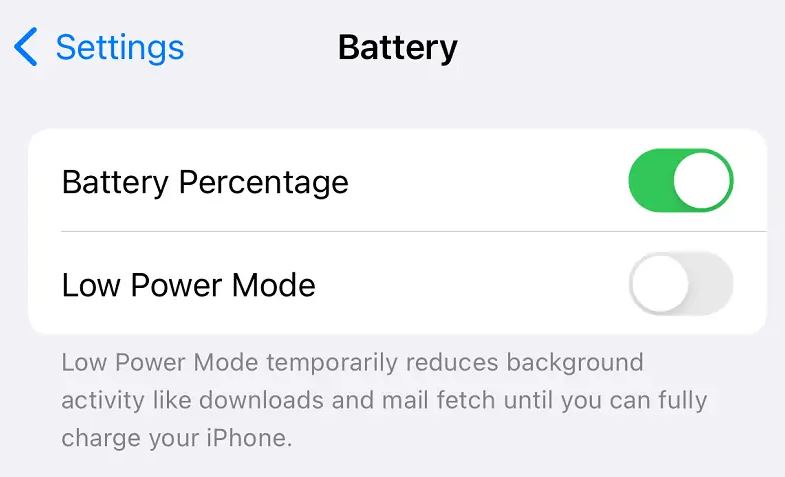
4. Ensure Low Power Mode is disabled
The StandBy feature might also fail to activate when the Low Power Mode is active on your iPhone. This happens to save battery while your phone charges in the background.
If StandBy still isn’t working on your iPhone, you should check if Low Power Mode is causing the issue. To check, look at the battery icon in the top right corner of your screen.
If the icon is yellow, that means Low Power Mode is on. You can turn it off by opening the Control Center (swipe down from the top right corner) and tapping the Low Power Mode icon.
If you don’t see the Low Power Mode icon in the Control Center, you can turn it off this way:
- Open the Settings app and go to Battery.
- Turn off Low Power Mode at the top.
- iPhone Low Power Mode – StandBy Not Working on Your iPhone
That’s it, you have successfully disabled the Low Battery Mode on your iPhone. And, as a result of this, the StandBy mode must activate on your iPhone/iPad. Also check How To Fix “Twitch Network Error Code 2000
5. Disable and re-enable StandBy
If none of these methods are helping you out with resolving the StandBy off issue, you better disable and then re-enable this StandBy feature. For this, you need to follow these easy steps –
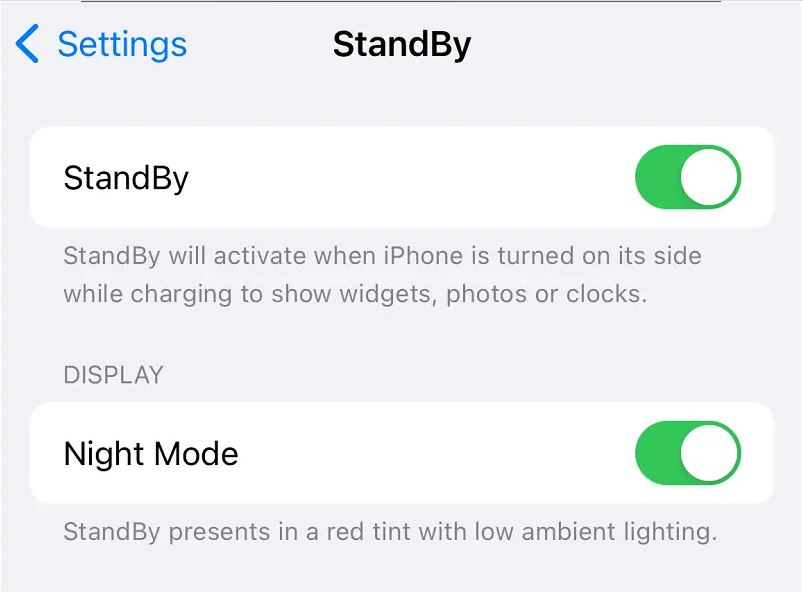
- Open the Settings app and go to StandBy.
- If you’re using Night Mode, turn it off.
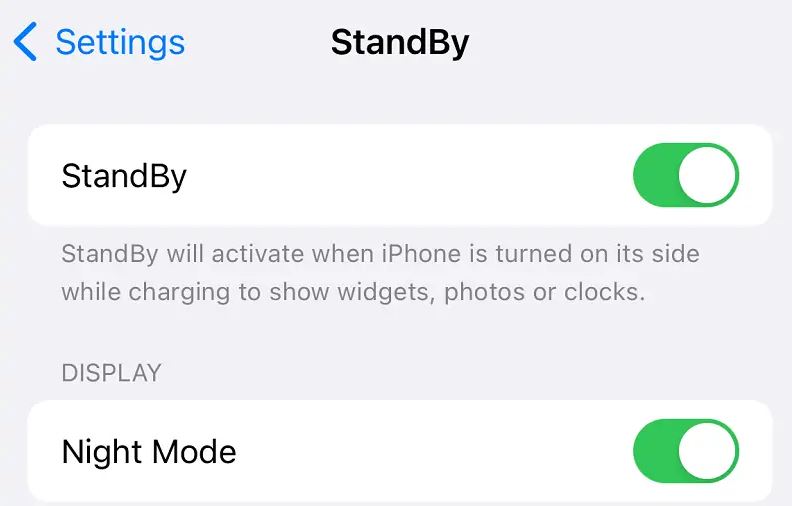
- Standby Settings – StandBy Not Working on Your iPhone
- Turn off the main StandBy toggle at the top. If you see an option to turn off Motion to Wake, disable this as well.
- Close Settings and all other apps running in the background.
- Wait for a few seconds and then tap over the Settings icon again.
- Click StandBy and then enable its toggle switch. Enable its toggle switch by moving the slider to the right.
- In case, you want Night Mode back, turn it on again.
Now that you have disabled and re-enabled the StandBy, plug in your iPhone to a power source, and set it sideways. Wait for a few seconds and you will notice the StandBy mode activating on its own.
6. Restart your iPhone
The StandBy issue must have been resolved by now and you are now getting a glimpse of what this StandBy actually does. In case, it still doesn’t work, the next logical solution is to restart your iPhone.
If the StandBy is failing to launch on account of some software glitches, turning off/on your iPhone might help you to fix this issue. Here’s how to perform this task –
Open the Settings app and tap on StandBy. When this opens up, make sure to disable its main toggle switch, available at the top.
Close the Settings app next and then press and hold both Volume down key and Power button for 2-3 seconds. You will see a slider on the top of your screen. Slide it to the right so that your device turns off successfully.
Next, hold down the Sleep/Wake button until you see the Apple logo. Your phone will restart normally. Once it’s back on, open Settings again and tap on StandBy. You may now enable StandBy on your iPhone and give StandBy a test.
- For this, Plug your iPhone into a charger, put it sideways, and let it sit without using it for a bit.
- StandBy should start working on your phone just like it’s supposed to.
7. Use Certified Charging Accessory
If StandBy remains inaccessible, check whether your Lightning cable or MagSafe charger is MFi-certified. If it isn’t, you might occasionally see a pop-up indicating that the accessory may not be supported.
While Apple doesn’t mandate the use of MFi-certified chargers, it’s strongly recommended, especially if StandBy fails to activate on your iPhone.
8. Reset your iPhone
If the StandBy mode fails to activate on your iPhone even for now, all you have is one option and that is resetting your iPhone. Since doing it renews your phone, there’s a possibility that the StandBy might start working from here onward. Here’s how to perform this task – Also check How To Fix 0xc000000f Error On Windows
- Open the Settings app and find StandBy.
- When found, click on it and turns off its toggle switch.
- Go back to the Settings app and tap on General.
- Scroll down & look for Transfer or Reset iPhone.
- Here, you will find an option to Tap Reset. Well, click on it and choose Reset All Settings.
- When you are asked to put in your passcode, provide the same or simply hit the Yes button.
Now, your iPhone will restart and reset all its settings. Once it’s done, your iPhone will start up like usual. You can go back to the Settings app and turn on StandBy. Try using it when your phone is plugged in, and you’re not using it, with the screen turned sideways.
Hopefully, one of these troubleshooting steps indeed helps you solve the StandBy not working issue on your iPhone. Do ask in the comment section if you face any difficulty following the above tips and tricks.


Add Comment