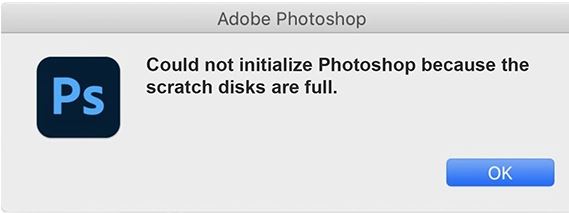
Best Ways To Clear Photoshop Scratch Disk Full On Mac will be described in this article. In this tutorial, we’ll go over the reasons behind the “the scratch disk is full” error that Photoshop may show you and provide you six ways to fix it on a Mac. It’s likely that if you’re reading this, you’ve had the “scratch disk full” problem in Photoshop on your Mac. It may be impossible for you to begin Photoshop, save images, or even make adjustments if your scratch drive is full.
Best 6 Ways To Clear Photoshop Scratch Disk Full On Mac
In this article, you can know about Best Ways To Clear Photoshop Scratch Disk Full On Mac here are the details below;
Are you curious as to why this is happening and how to resolve it on your Mac? If you keep reading this blog, you will find all the answers you need.
What is the Scratch Disk in Photoshop?
Let’s first define a scratch disk before we offer answers for the entire Photoshop scratch disk issue.
A hard drive or SSD used for the temporary storage while Photoshop is open is called a scratch disk, according to Adobe. When you have portions of your documents their history panel states that don’t fit in your Mac’s RAM or memory, Photoshop uses this space to keep them. Photoshop uses the Macintosh HD, the primary scratch disk where macOS is installed, by default.
Reasons Behind the Full Scratch Disk Error in Photoshop
Temporary files are the primary reason for the Photoshop’s scratch disk becoming full. Photoshop is a sizable design program, as you are aware. It can improve Photoshop’s performance by producing a large number of temporary files when you use it to create and modify photos. But eventually, these files stack up and take up a significant amount of space on the scratch disk.
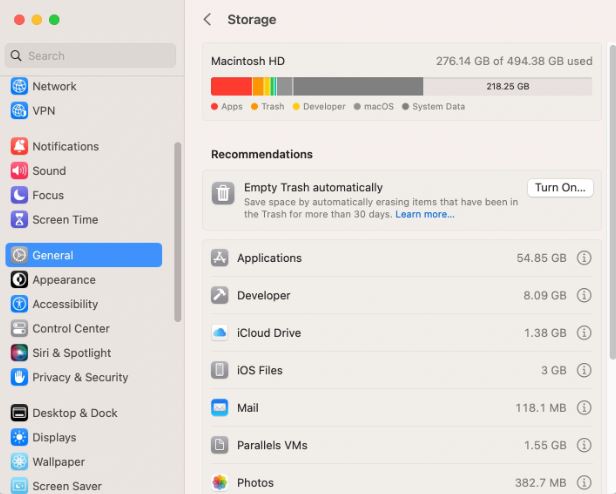
You can also get a notification saying that the scratch disk is full if the hard drive that is being used as it does not have enough space left on it. Click the Apple Menu > System Preferences > General > Storage to see the amount of available storage space.
An additional cause of the scratch disk full error is Photoshop’s inadequate RAM. You might need to increase extra memory in this situation.
How to Clear the Scratch Disk in Photoshop on Mac
Now that we know what a scratch disk is and the reason behind Photoshop’s scratch disk full error, let’s concentrate on the most important detail: how to remove the scratch disk.
1. Clear Photoshop cache
Photoshop comes with an integrated cleaning capability that lets you get rid of caches and history. Please be aware that there is no way to undo the deletion of any history or caches.
Here’s how to use Photoshop to empty its caches:
- Start your Mac and open Photoshop.
- Hover your cursor over Purge and choose the item you wish to clean, or select All to erase all caches in Photoshop, by clicking the Edit button in the menu bar.
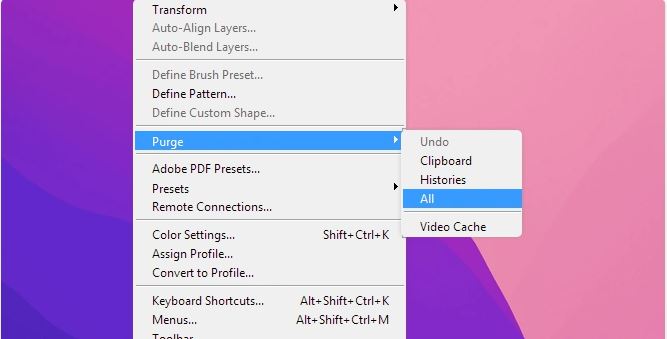
- You will be notified in a new window that your deletion is irreversible. In the event that you are certain, click OK.
2. Free Up Disk Space
When using Photoshop, Adobe advises setting aside at least 20GB of free space on your macOS hard disk. To make sure Photoshop functions properly, you might also need to set aside more storage space, depending on the kind of files you are working with.
You can increase the amount of disk space on your Mac by doing a number of tasks, such as deleting items that aren’t in use, eliminating duplicates, uninstalling programs that you don’t want, and transferring files to another drive.
We’d like to present you to BuhoCleaner, one of the greatest Mac cleaners, as a useful tool. It can expedite the process of locating and eliminating huge files and duplicates in addition to assisting you in removing junk files from the system, users, and programs. To try it, click the button below.

3. Delete Photoshop Temporary Files
Photoshop creates a lot of temporary files when you use it. These temporary files can be located and removed manually with Finder. Temporary files usually have the extension “.tmp” at the end and begin with “pst”, followed by a number.
The steps are as follows:
These are the steps to follow:
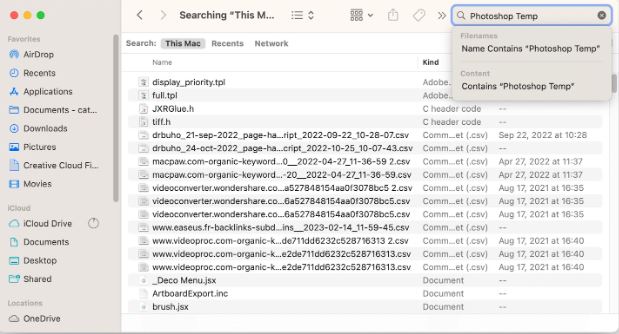
- On the Dock, click the Finder icon.
- In the search field located in the upper the right corner of the Finder window, type “Photoshop Temp”.
- Find the temporary files you wish to delete in the list that pops up, then drag them to the Trash.
This could be a lengthy procedure. Before moving forward, make sure the files you wish to remove are no longer needed by you.
4. Change Photoshop Scratch Disk
If you haven’t given Photoshop enough disk space, you might want to use a different disk as a scratch disk. You might need to install a new disk on your Mac if you don’t already have one, and an SSD is a great option.
Here’s how to modify Photoshop’s scratch disk:
- Select Scratch Disks from the Photoshop Menu > Preferences menu.
- Click the OK button after checking the box to designate or remove the disk as the scratch disk.
- Open Photoshop again.
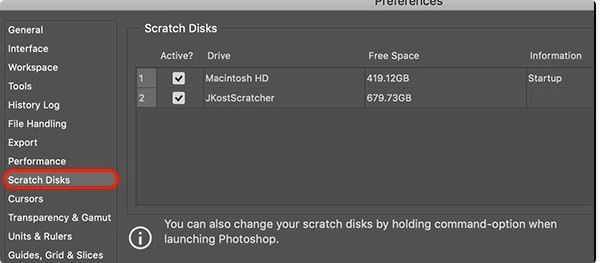
Additionally, you may easily switch your scratch drive by starting Photoshop and holding down the Command + Option buttons.
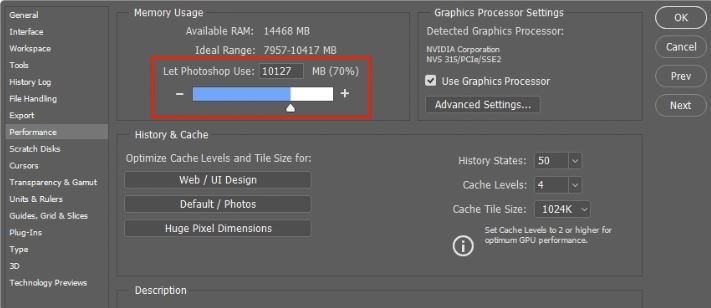
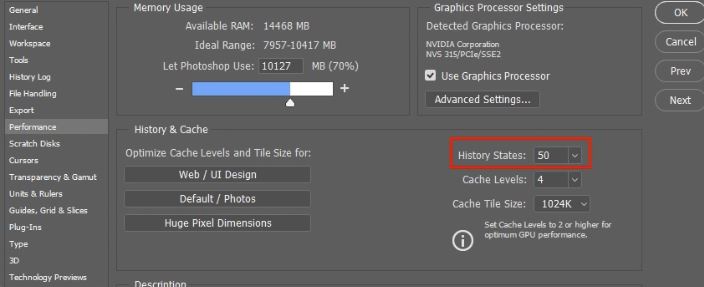
5. Change RAM for Photoshop
Photoshop takes up 70% of the RAM by default. This value can be changed as necessary. To avoid inadequate memory causing poor performance in other apps, we strongly advise against going over 85%.
- To access Performance preferences, click the Photoshop menu and choose Preferences.
- To change the RAM allotted to Photoshop, use the memory use slider.
- After selecting OK, restart Photoshop.
6. Optimize Photoshop Space
Photoshop can be made to use less space by restricting its history states and turning off auto-recovery saving.
- Click the Photoshop Menu > Preferences > File Handling menu and uncheck the option next to Automatically Save Recovery Information Every to disable the auto-recovery saving.
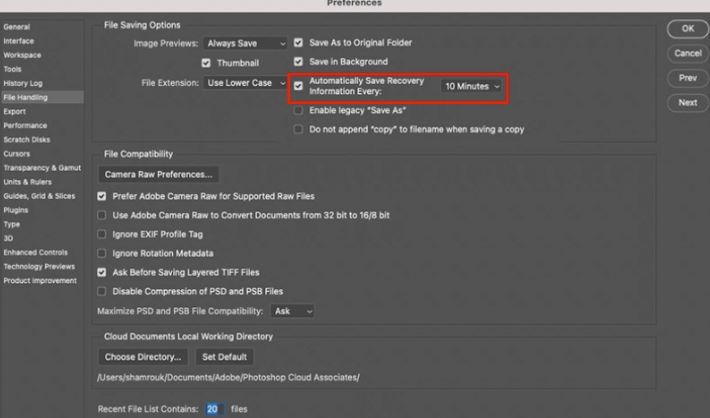
- Photoshop’s history state limit is set to 50 by default, but it can be increased to 1000.
Conclusion
You now know how to fix Photoshop’s “scratch disk full” error when using a Mac. We trust that by employing the previously mentioned techniques, you were able to resolve this issue. If not, you can try other methods like defragmenting your hard drive, boosting your RAM, or even resetting your Photoshop preferences.


Add Comment