How To fix Samsung Galaxy Service will be discussed in this article. Why does my phone still say No Service on Android even when I have service or a SIM card in it? If you receive a notice on your Android device stating that there is no service or signal, continue reading.
How To fix Samsung Galaxy Service In 2023
In this article, you can know about fix Samsung Galaxy Service here are the details below;
Why does my Android phone say no service – Sim Card nserted Buy No Service on Android?
We’ll share some of the best fixes with you so you can solve the issue. Let’s start now!
The Android “no service” issue could be caused by a number of factors. Radio signal, Airplane mode, poor reception, problems with your wireless carrier, SIM card problems, software faults, etc. can all cause it to occasionally occur.
Before we get started
Ensure:
- Make sure your wireless provider has an active mobile data package for you and that your reception is strong.
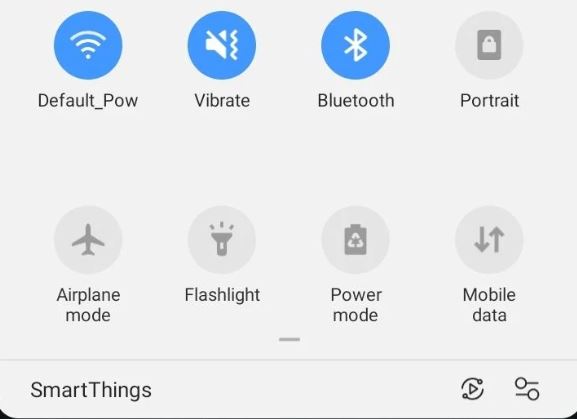
- It is not in airplane mode. Airplane mode may be found under Settings > Connections. Turn the switch knob.
Quick Tips
- Put your SIM card back in after removing it. Put your SIM card in another phone if you have one nearby and try to make a call.
- Switch to mobile data
- Switch off your phone.
- Set the proper SIM Card to active.
- Refresh your APN settings.
How to Fix the No Service error on Android
Method 1: Restart Your Phone.
If you experience any problems with your Android device, you should start with this.
- Keep holding down the power button.
- Tap Restart when the menu appears.

Method 2: Toggle Airplane Mode
To find the flight or airplane modes fast, pull down the notification area. Please switch it off, then on again.
Method 3: Select Preferred Mobile Network
A preferred network can occasionally be manually chosen to resolve the “No Service” problem. To do this:
- Access Settings.
- Connect by tapping.
- Search for Mobile networks, then select it.
- When you tap Network operators, a search for all the networks in the vicinity will begin.
- Select your network provider manually if it appears.
Method 4: Set Network Mode to Auto
Take these actions:
- Then select Wireless & Networks or Connections.
- Certain mobile networks
- Choosing Network Mode
- You’ll see a pop-up menu with all of your available alternatives. Make sure to choose the first choice marked 4G/3G/2G (auto connect).
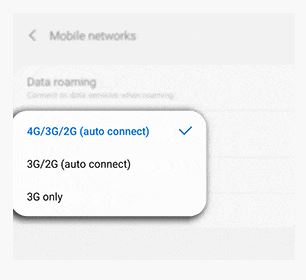
If you choose this, your device will be linked to the correct network.
Method 5: Activate the Correct SIM Card
Go to: to enable your SIM card.
- Connectivity Tap Settings.
- Tap one or both switches for the SIM or USIM cards in the SIM card manager to activate them.
- Update your APN settings using method six.
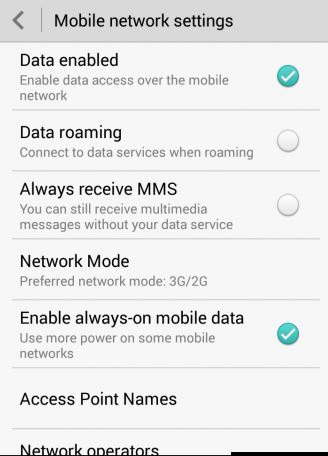
Method 6: Update your APN settings
Access Settings.
- Select Connections.
- Select Mobile Networks.
- Identify Access Points
- Select More (3 dots).
- Select Reset to Default.
- Enter the new APN Settings after that.
Method 7: Re-Insert SIM Card
Another potential offender is the SIM card. Make foolproof the SIM card is inserted appropriately. To properly eject the SIM card, use a tool. Verify that it is not broken. Make a replacement request to the carrier if the card is damaged. Also check IFTTT Alternatives
Method 8: Enter service mode
To use this method, you must first open the dialer and then carry out the subsequent procedures.
- Dial the following code: *#*#4636#*#
- Switch to service mode
- Select Device information or Phone information from the list at the top.
- After that, click Run Ping Test.
- At the bottom of this screen, you’ll see the radio button.
- Verify whether it is on or off. To activate the radio, please press the button next to it.
- You’ll be asked to restart the gadget.
- Your phone will restart once you select reboot. Once finished, make sure the issue is fixed.
- Check out our collection of the complete MMI and USSD Code lists for both iPhone and Android devices, including Samsung.
Solution 9: Software Update
Your phone’s software should be updated. Please go to:
- Settings
- Scroll to the very bottom of the page
- The Software Update option
- Please be patient while it restarts and updates.
Method 10: Custom ROM
If you have a custom ROM loaded on your Android device, you could occasionally experience a “No Service” error. Therefore, you must return to the original ROM. It can be set up through recovery mode.
Method 11: Resetting the network settings
Resetting the network settings is the next technique to attempt. It’s easy to use and highly efficient.
The only “problem” is that you will need to redo several setup steps, such as logging into Wi-Fi networks, inputting passwords, pairing the phone with Bluetooth devices, etc.
- Access Settings.
- Then select General Management.
- Press Reset.
- Select Reset Network Settings.
- Select Reset Settings.
- Note: Enter your PIN, password, or pattern when prompted.
- To confirm, tap Reset Settings once again.
Method 12: Call Your carrier
Think about contacting your wireless provider. Find out whether there is a problem with the carrier network from them. If not, request a new SIM card from them.
- Make sure your wireless provider has an active mobile data package for you.
- Make sure the reception area is welcoming.
Method 13: Corrupt ESN
A nulled or unidentified IMEI number might occasionally cause a corrupt ESN “No Service” error. It is crucial to determine whether your IMEI number is corrupt or null before restoring it. This is how to accomplish it:
- The IMEI number of the smartphone is displayed after you input the code (*#06#) in the dialer after turning on your cellphone. If “Null” is displayed, the IMEI number is invalid.
- Use the phone dialer to enter (*#197328640#) or (*#*#197328640#*#*). Users must choose “Common” from the list of options.
- Next, choose Field Test Mode (FTM), option 1. It should be turned off. The IMEI number will be restored by this procedure.
- Select option 2 to disable FTM, then go back to the key input.
- Now take the SIM card out of the device and wait two minutes before putting it back in.
- Once the gadget is turned on, dial (*#197328640#) once more.
- Select Debug screen > phone control > nas control > RRC > RRC revision from the menu that appears.
- Choose Option 5.
- Switch off your phone.
You can also read: Fix Not Registered on Network and Restore Galaxy Null IMEI #. Also check voice changer while calling
Bonus: Clear SIM Card Manager Cache
- Access Settings.
- Open Apps
- Select the Menu Icon (three dots).
- Select Show System Apps.
- A SIM Card manager search
- Clear Cache by selecting Storage.
Method 14: Factory Reset
Resetting the phone to manufacturer settings is the last available option. First, make a backup. Once completed, proceed as follows:
- Access Settings
- Press Reset.
- The Factory Data Reset option


Add Comment