How To Fix Zoom Error When Your Internet Connection Is Unstable will be described in this article. How to Fix an Unstable Internet Connection and Zoom Error? One of the numerous widely used remote work and learning tools in the world, Zoom is a technology that fosters community. Zoom may occasionally show different error numbers on the screen that indicate your connection is unstable. You may also have frequent disconnections and problems with audio or video buffering if your Zoom connection is unreliable.
How To Fix Zoom Error When Your Internet Connection Is Unstable
In this article, you can know about Fix Zoom Error When Your Internet Connection Is Unstable here are the details below;
Usually, this Zoom Error occurs while a video conference is in progress. You therefore don’t have much time to change your settings or track down the offender. But if you are using your camera, try turning it off as a temporary fix.
However, by doing so, you can save up valuable bandwidth, which should maintain the quality of the screen and audio sharing and enable you to actively participate in the conference.
1. Check your Network Connection
Restarting or unplugging your modem & router is the best way to ensure that your Internet connection is steady. Assume that firmware upgrades for the router are still due. Put them on your gadget.
Verify whether any other devices are connected to your network and disable them in order to grant Zoom access to your entire bandwidth. Additionally, you will use an Ethernet cable—which is faster and more reliable than a wireless connection—to further accelerate your connection.
Make sure you are close to the Wi-Fi router if you are unable to use a cable connection. The Zoom video conferencing PC should normally be located no more than a few feet from your router. Also check How To Fix ERR SSL PROTOCOL ERROR On Windows
If not, try using a different Wi-Fi channel and see if there are any differences.
Once you have completed all of these steps, make sure you fulfill the bandwidth requirements by checking your connection (at least 2 Mbps up/down is recommended).
It should be noted that temporary issues with your ISP’s infrastructure may also have a detrimental effect on your Internet access. Now, contact your internet service provider to see if any known server or infrastructure issues exist.
2. Disable bandwidth-hogging Programs
Let’s say that there is another background software running. In this situation, we advise turning them off, particularly if the software in question is bandwidth-hungry applications like cloud sync apps, streaming services, video-sharing apps, and the like.
Assume you are using a VPN. Turn it off and see if the stability of the network has improved. Unusual statistics indicate that if you use a VPN server that is not situated in your area, you may experience a 30% or even 50% slowdown in your connection.
3. Disable SIP ALG and QoS
Application Layer Gateway, or SIP ALG, is a feature that many routers have installed. Its primary function is to avoid router and firewall problems. However, it’s wise to disable SIP ALG because it occasionally causes more issues than it solves.
To deactivate SIP ALG, take these actions:
- Navigate to the Advances settings or the Advanced Tab on the admin page of your router.
- Choose Setup and WAN setup after that.
- Here, find the NAT filtering option and select it to disable SIP ALG.
- Now, restart your router and see whether Zoom continues to identify an unreliable connection.
Depending on the model of your router, certain steps might change. The SIP ALG capability is located under firewall settings on outstanding routers. Visit the help page of your router’s manufacturer for comprehensive instructions.
Recently, several have argued that it could be helpful to disable QoS (quality of service). Just to refresh your memory, QoS is a typical router capability that allows traffic to be prioritized.
4. Renew your IP address
Another possible resolution for this unreliable Zoom connection issue is to restore your IP address.
Start and open the administrator-only Command Prompt. Also check How To Fix Easily WhatsApp Photos Not Showing In Gallery
Now, type the following instructions, pressing Enter after each command:
- Reset the netsh winsock
- Netsh int ip reset
- ipconfig /output
- Renew or ipconfig
- flushdns /ipconfig
Finally, start Zoom after restarting your computer.
5. Change DNS Settings
- Select Network & Internet under Settings.
- Select your internet source.
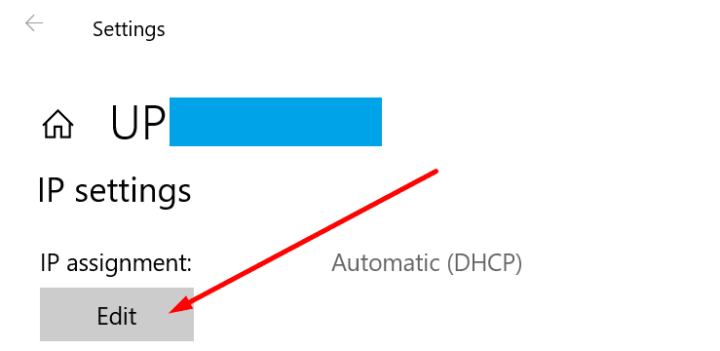
- Select the IP assignment icon after swiping down to the IP settings. Windows 10 assignment settings
- Depending on how your network and hardware are configured, choose Manual and activate IPv4 or IPv6.
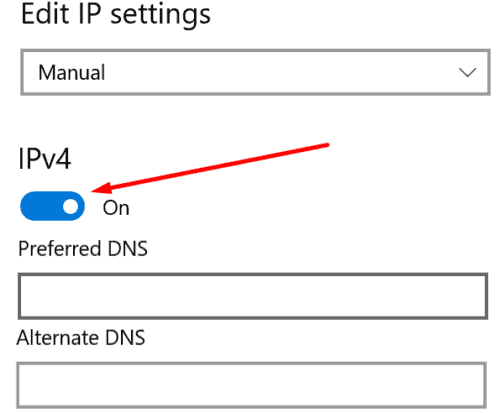
- Input your desired primary and secondary DNS addresses here:
Google Public DNS: 8.8.8.8 and 8.8.4.4 -Cloudflare DNS: 1.1.1.1 and 1.0.0.1
OpenDNS addresses are 208.67.220.220 and 208.67.222.222. After making these adjustments and restarting your computer, see if the zoom error has disappeared.
Final Words:
If your internet connection is unstable, let us know which resolution fixed the zoom error for you.


Add Comment